Smart PC Locker Pro is a free, lightweight and an efficient system locking tool that can protect your personal data from thieves while you are away. Smart PC Locker Pro automatically locks up your Windows system after a specified amount of inactivity and once the computer is locked, it can be only accessed by your password. This is a great tool for you, if you leave your computer desk very often.
Smart PC Locker Pro features
Smart PC Locker Pro supports Instant Resume which means, while unlocking you just need to enter the password and hit ‘Enter’ and you will be there where you left your work, no sign in and sign-outs are required. Other than locking up system, the application comes with a set of another essential and useful features which are discussed briefly in this post.
Start-up: The program can start up with Windows and can even lock the system on start-up, this can be very useful if your Windows user account is not password protected.
Security: The program comes with a complete security package. It can block CD-ROMs while the system is locked, it can disable Windows Task Manager, it can password protect itself and can also shut down the computer after a few minutes of locking. It is recommended to disable the task manager as it can create a flaw in maintaining the security of your computer.
Hotkey: The hotkey lets you instantly lock the system with just a combination of keys. The keys must include ‘Ctrl’, ‘Alt’, ‘Shift’ or all of them followed by a letter key.
Power Saving: This tool can save you enough power by automatically switching off the monitor after a specified time and moreover it can even shutdown the computer after a specified amount of time.
Inactivity: The tool can automatically lock the computer while it is inactive. The inactivity time can be set from the settings and under inactivity settings you can even make exceptions like you can prevent locking if any of your specified applications are running or you can prevent locking if any full screen app is running.
Wallpaper: By default, it displays a solid background color but you can add your own background to lock screen under the wallpaper settings.
Overall, the tool is well built with lots of amazing and useful features. The instant locking and power-saving features are worth the tool. The UI is simple and clean, once you’ve personalized the settings you need not open it again and again, you can simply use the hotkey to lock the computer. A great tool if you leave your computer idle very frequently.
Click here to download NoVirusThanks Smart PC Locker Pro. The program is also able to lock the PC in Safe Mode.
When working in Print Layout view, you can display & view multiple pages on the screen at the same time. Word 2013 supports this feature. This proves handy especially, when you have a large, high-resolution monitor and would want to see two pages side by side to check for correct spacing when printing out planner pages. Let us illustrate this feature in Word 2013.
View multiple pages in Word
Assuming you have a blank document page opened, switch to ‘View’ tab. It’s on the extreme right.
From the section, select ‘Print Layout’ option.
Now, keeping the View tab in an active state, place the mouse cursor in the text of the first page you want to view in the multiple-page view. Then, from the Zoom section chose ‘Multiple Pages’ option as shown in the screen-shot below
You should now find 2 pages displayed side-by-side. The pages will be reduced in size so as to offer multiple pages view. All though this view is good for viewing multiple pages in a single shot, it is not so for reading the document.
To switch back to a single page view, click “One Page” in the “Zoom section of the View tab. The page in which you had placed the cursor displays, but reduced in size display. To zoom back to regular size, click “100%” in the “Zoom” section.
Now, for viewing more than two pages at a time, click the “Zoom” button in the “Zoom” section of the “View” tab.
Instantly, the “Zoom” dialog box shows up. You can zoom to desired percentage, widths, or the whole page. For viewing multiple pages, select the “Many pages” radio button.
Next, click the monitor button below the radio button. Now, you are in a position to select the number of pages you would wish to view at a time from the drop-down menu.
To have a preview of the settings, hit the “Preview” button and it will show how the pages are displayed.
Finally, click “OK” to finalize the changes and close the “Zoom” dialog box.
To undo the changes made, click the “One Page” button. To go back to viewing your text at 100 percent, click the “100%” button.
A Windows Tablet is capable of offering the best of both the worlds – Touch and Mouse/Keyboard input. If your device has them and if you want to, for some reason disable the touch screen on your laptop, ultrabook, notebook or touch device and strictly use your Windows 10 / 8.1 / 7 device as a PC with the classic mouse and keyboard combination, you can do so as follows. Windows 10 does not have any built-in option to turn off the touch screen on the fly, by you do so by using the Device Manager.
Disable Touch Screen in Windows
From the WinX Menu, open Device Manager and search for Human Interface Devices. Expand it.
Then, right-click on HID-compliant touch screen and from the list of options displayed, select ‘Disable’.
Instantly, a confirmation pop-up will appear on your device screen, requesting you to confirm the decision.Disabling this device will cause it to stop functioning. Do you really want to disable it?Click ‘Yes.’
Your touch screen functionality will be disabled immediately.
At any point if you would like to enable touch screen functionality again, simply go back to the Device Manager, right-click HID compliant touch screen, and select Enable.
Remember, you will be required to restart your PC to enable the touch screen functionality again.
If you find that your Windows Touch Screen Laptop, Tablet or Surface Tablet Touch Screen is not working, you may try some of these tips and see if they help you troubleshoot fix the problem. See this post titled – Windows laptop or Surface Touch Screen not working.
When Windows 8 used to boot to Start Menu, people wanted to boot directly to the Desktop. Now when Windows 10 boots to desktop, there are some who want to boot to the Start Screen.
To enable Windows 10 Start Screen, you will have to enable Tablet Mode in Windows 10. To enable Widows 10 Tablet Mode, click on the Notifications icon in the taskbar. You will see the Notifications panel open.
Click on Tablet mode. The Start Screen will be enabled. The Continuum feature allows Windows 10 to switch between the Desktop and tablet mode seamlessly. To see the Start Screen, click on Winkey or your Start Button.
Your active application will go full-screen, and the Start Screen will be enabled. You will see a change in the taskbar. Open apps will no longer rest on the taskbar. You will see only a Back button, a Search icon and the Task View button. Task View is a new desktop feature in Windows 10 that allows users to create multiple desktops on the same Windows PC. It also allows for quick switching between open files and apps.
To launch new apps and desktop software you will have to do so via the Start Screen.
To see the open apps, you will have to click on the Task View button, or cycle through them using Alt+Tab keyboard shortcut.
You will notice that the Windows 10 Start Screen now scrolls vertically. You will also see a 3-lined Hamburger menu. Clicking on it will open the ‘left side of the panel’ which was present on the Start Menu. This includes Most used, Recently opened and Other links.
Enable Start Screen without enabling Tablet Mode
If wish to enable Start Screen without enabling the Tablet Mode, then the best option for you would be to enable full-screen Start. There seems to be no option to have the Start Screen in the Desktop mode, like we had in Windows 8.1.
Computers with low storage device and low RAM always run out of space and memory with the passage of time. In this scenario a user either need to upgrade the storage devices or simply need to remove the unwanted and unneeded programs and softwares. However for a non technical person it is hard to know which program is safe to remove and which one is not.
Although it is hard to answer because it totally depends on the operating system used by the user and the number of programs that the user is currently using. Some of the programs are needed to run another software and removing such programs can stop the software from running, so it is always advised to be careful when removing a program.
In this short Post I will be sharing some of the tips that could help you in deciding weather a program needs to be uninstalled or not. Have a look on the tips below:
1# Third Party Programs
Although there could be other but I recommend “Should I Remove It” because it is FREE and can be used to uninstall programs securely. Download the software from here. With each program the software adds a button “What is it?” allowing you to know more about the program so that you can be sure that the program will not effect any of the currently used software.
2# cCleaner
cCleaner is a great software built by Piriform which scans your computer for temporary files, cookies, internet history and makes your PC faster. However this program can also be used to uninstall programs which are currently installed in your computer. It shows the list of all programs under the “Tools>Uninstall” panel and you can directly uninstall from there. However you still need to watch out for the programs that may effect the functionality of the other softwares.
As I mentioned earlier it all depends on the operating system and softwares installed by the users. However below are some of the programs that should not be removed.
Any files associated with Microsoft .Net Framework
Any file associated with the manufacture of your computer/laptop. e.g Dell, HP,Lenovo etc…
Any file associated with Adobe. e,g Adobe Reader, Flash Player etc…
Any file which may be associated with a software or program that you currently use.
Drivers
4# Installation Date
If you are still not sure which one to uninstall, simply look out for the dates of the programs. If you have not install any important program recently then by looking at the dates you can remove the files that looks unfamiliar to you.
5# Programs to Uninstall
The following programs can be removed safely from any computer, considering if you don’t recognize them or if you have not installed personally OR you don’t need them any more. Have a look on the list below.
Toolbars
Multiple Programs such as Anti Virus, PC Optimizers etc..
Programs developed by Unknown Developers
Although There is not a precise list of files that can be considered safe to uninstall, however the above tips will give an idea of which programs can be removed safely.
computers with low storage device and low RAM always run out of space and memory with the passage of time. In this scenario a user either need to upgrade the storage devices or simply need to remove the unwanted and unneeded programs and softwares. However for a non technical person it is hard to know which program is safe to remove and which one is not.
Although it is hard to answer because it totally depends on the operating system used by the user and the number of programs that the user is currently using. Some of the programs are needed to run another software and removing such programs can stop the software from running, so it is always advised to be careful when removing a program.
In this short Post I will be sharing some of the tips that could help you in deciding weather a program needs to be uninstalled or not. Have a look on the tips below:
1# Third Party Programs
Although there could be other but I recommend “Should I Remove It” because it is FREE and can be used to uninstall programs securely. Download the software from here. With each program the software adds a button “What is it?” allowing you to know more about the program so that you can be sure that the program will not effect any of the currently used software.
2# cCleaner
cCleaner is a great software built by Piriform which scans your computer for temporary files, cookies, internet history and makes your PC faster. However this program can also be used to uninstall programs which are currently installed in your computer. It shows the list of all programs under the “Tools>Uninstall” panel and you can directly uninstall from there. However you still need to watch out for the programs that may effect the functionality of the other softwares.
As I mentioned earlier it all depends on the operating system and softwares installed by the users. However below are some of the programs that should not be removed.
Any files associated with Microsoft .Net Framework
Any file associated with the manufacture of your computer/laptop. e.g Dell, HP,Lenovo etc…
Any file associated with Adobe. e,g Adobe Reader, Flash Player etc…
Any file which may be associated with a software or program that you currently use.
Drivers
4# Installation Date
If you are still not sure which one to uninstall, simply look out for the dates of the programs. If you have not install any important program recently then by looking at the dates you can remove the files that looks unfamiliar to you.
5# Programs to Uninstall
The following programs can be removed safely from any computer, considering if you don’t recognize them or if you have not installed personally OR you don’t need them any more. Have a look on the list below.
Toolbars
Multiple Programs such as Anti Virus, PC Optimizers etc..
Programs developed by Unknown Developers
Although There is not a precise list of files that can be considered safe to uninstall, however the above tips will give an idea of which programs can be removed safely. You can also view the list of files collected byBleepingCoumputer.com that can be uninstalled safely.
Hope you like the article. If you you would like to mention any other tip or program, feel free to share below in the comment section.
Hope you like the article. If you you would like to mention any other tip or program, feel free to share below in the comment section.
OOne of the greatest things about owning a Macbook is that you’ll get the best of all worlds. You will not only be able to use the Mac OS X, but also install Windows 8on another partition. This way, you will be able to switch between operating systems depending on your needs at the moment.
I often find myself in situations where certain apps won’t work on Linux as well as they do on Windows or the other way around. Sometimes they do, but they simply don’t work that well. This is why I decided to install both of them and simply choose which one is best for the tasks I have to do at that given time.
You can do the same with your Mac just by using the instructions below. The central idea in both cases has to do with creating a new partition and installing the other OS on that specific partition. However, the steps you need to follow are a little bit different depending on whether you want to install Windows 8 or OS X Yosemite. For this reason, we’re going to start with the first one, and then move on to the necessary steps for the other.
Dual booting Windows 8 on your Mac
Windows is very easy to run on Mac because it requires one important feature –Bootcamp – and this one is built into the OS X operating system. The first thing to do before you get started is to buy a Windows license, and then follow the steps indicated below.
Step 1: Download the Windows 8 and Save it on a USB Drive
Before you install the necessary program, you will need to have the Windows 8 kit. You can easily download Windows 8 ISO from the internet and make sure that you purchase a license, so you don’t get in trouble later on.
Step 2: Open BootCamp
Another important aspect is BootCamp. You will need to go to the Applications folder on your desktop, and then click on Utilities. Once you’re in there, you should be able to find an icon corresponding to BootCamp – double click on that to launch the assistant.
Step 3: Create a new Partition
The reason why you need to use BootCamp is to create a new partition. The only way for you to boot Windows on this computer is by installing this operating system on the partition that we were talking about. Therefore, you will need to set the size at 16 GB so that you have enough space for the OS and click on the button saying Partition. The Mac will then restart.
Step 4: Install Windows 8
When the computer begins restarting, you have to insert the USB stick or DVD where you downloaded the executable. By running the installation process for Windows 8, you will have the option of choosing which partition you want it to be installed on – choose the BootCamp one.
Step 5: Use the Partition
Once you choose your partition, you will need to click on Drive Options and select Format. This will prompt the installation, and your computer will let you know when it’s done. You will then have to remove the USB drive and start using the partition that has Windows 8 installed on it.
Any time you turn the Mac on from now on, you will have the option of booting into Windows. You simply need to hold down the Option key, and then select your prefer operating system. This is the easiest ways to dual boot Windows on a Macbook, and it can be done in less than an hour.
The mobile boom brought forth a world of opportunities to creative individuals – especially musicians. Gone are the days when these artists were bound to full studio equipment (which costs fortunes) in order to get anything done. Professional music makers still need those, but our smartphones and tablets are more than capable of taking a quantifiable load of work.
What really makes us grind our teeth here at Android Authority is the fact that Apple has had a foothold on the music industry for a long time (in terms of mobile music making, at least). This is changing, as there is a plethora of Android developers making great apps for musicians, but we need to dig deeper into the platform in order to understand what’s going on.
Apple wasn’t doing amazingly well among musicians only because of its fame and widespread support; Android devices did have a limitation, which proved to be a huge slow-down. iOS has offered audio low-latency for a long time, something Google only implemented with the introduction of Android 5.0 Lollipop, along with multi-channel audio stream mixing and USB audio support.
With these changes in place, and considering Android does own the market in terms of numbers, we are sure to see some great developers getting on board with our favorite mobile OS. In the meantime, we would like to share some great apps any musician and music maker should take a look at.
Guitar Tuner Free (previously known as Guitar Tuna)
This app’s design is great, and I love having it around to tune my instruments. Mostly because it has support for tuning multiple instruments, including guitar, bass and ukulele (my personal favorite). It includes games for learning to play, a metronome and a design that makes it a breeze to use.
Serious musicians will also love that it touts “award-winning audio technology” and “professional accuracy for advanced players”. And with over 5 million downloads, this app sure has its fair amount of popularity.
Even the best of musicians forget lyrics, so it’s always convenient to have a lyric app around, just in case you need it. This application grants access to lyrics for more than a million songs, something considered to be heaven-sent to many cover musicians around. Lyrically can even recognize the music you are playing on your phone and present the right lyrics on the screen.
Having trouble syncing to a beat? Metronomes are no longer just tools that need to sit on top of a table. You can carry it around in your pocket, thanks to the power of our smartphones. Pro Metronome was a hit on iOS, and us Android users can also take advantage of it now.
Sure, other tuning apps include metronomes, but this one is far superior. The user can choose between many timing styles. Users can also “access subdivisions, poly-rhythm settings, and create complex patterns with triplets, dotted notes, and non-standard time signatures” if they purchase the Pro version. It’s also more precise than a real, mechanical metronome, as it’s not affected by friction, air resistance and other natural factors.
Musicians love their high quality sound recording. Sound needs to be as pristine as possible, and even though mobile is not quite up there with studio standards, I have to say RecForge Pro is about the closest you can get to the real deal.
RecForge Pro is a serious audio recorder. It can record in mp3, ogg or wav, and you can convert audio files between those formats, as well. It has support for storing clips in the cloud, and one can even edit these sound clips before doing anything with them. There’s a wide array of settings and tools for making your sound as perfect as possible.
I will advice that you get a good microphone to use with your handset, as phones usually don’t have the best microphones integrated.
How many times have you gotten inspired during your commute to the city, without an instrument within reach to hear how well your new song ideas work out? After all, music often sounds very different in your mind than it does coming out of an instrument.
Walk Band is meant to be more of a creative music-making app, with multi-track recording and a series of digital instruments you can play around with. That’s all fun, but I use it more as a tool for translating my thoughts into sound waves when on-the-go. Maybe you will find it just as convenient, so give it a go!
Here is one area where Android is still a bit behind, with apps like Traktor DJ putting all their chips on Apple. That’s not to say there aren’t some good DJing Android apps out there, though. One of my favorites is DJ Studio 5. It’s completely free and all they make money on are skins. No ads, no hidden charges, no catch.
DJ Studio 5 is simple enough to welcome beginners, yet it has its good share of more complex features for the advances DJs out there. You at least have to try their unique scratch system and disk physics!
Sadly, we are far from getting anything similar to Garage Band, which continues to be a great tool even for some serious musicians. With that said, w can also say there are some great apps like Caustic 3 around, which allow us to create music from our mobile devices.
This app’s design is inspired by rack-mount synthesizers, which I say give it an awesome style. You can choose from a wide variety of synthesizers and different sounds. It’s fun and it’s free to use. You will need to pay $9.99 if you want the ability to save or export your projects, though.
Of course, this is all the opinion of one humble musician here. I am sure many of you have found great uses for other apps, and maybe you even have better alternatives to the ones I happen to love. Whatever the case may be, please do share your thoughts on the comments below.
Do you use any of these apps? Which are your favorite applications for making music?
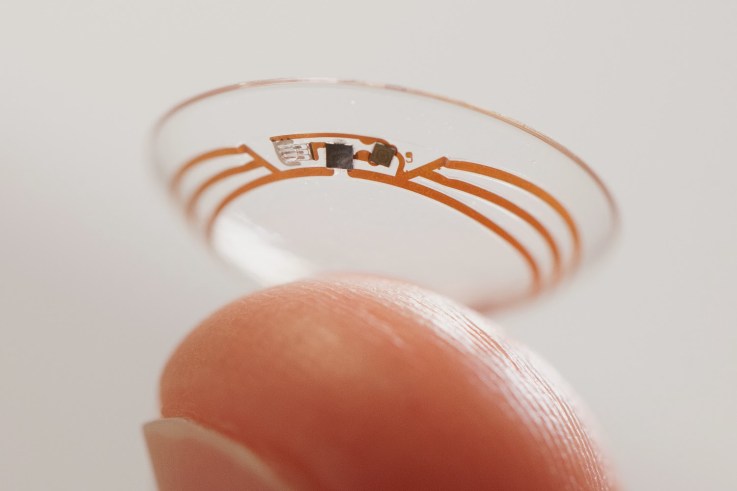
Google's smart contact lens that will measure glucose levels in diabetics by analysing their tears may be on the market before 2019.
In a recent patent application, Google showed off potential designs for how it could package a smart contact lens, suggesting the project could be further along than thought.
Last year, the company announced that it was working on a lens that would be able to measure a wearer's glucose levels by analysing their tears.
The lens could potentially remove the need for diabetics to prick their fingers and draw blood to check their blood-sugar levels.
Google has previously said that general availability of the contact lens is most likely at least five years away.
However, for a project that is supposedly in the research phase, it seems an interesting step to apply for a patent on how to package the product for consumers, according to Quartz.
A representative for Google said that product releases can not be inferred from patent applications.
Saturday, 27 June 2015
Format Recovery - Recover Data after Formatting
Table of Contents
1. The Possibility of Data Recovery after Formatting
2. Free Download Data Recovery Software to Recover Files after formatting
3. The Possibilities That You May Perform a Formatting
4. What You Should Pay Attention to When You Lose Data after Formatting?
The Possibility of Data Recovery after Formatting
When you perform a formatting on a storage device such as memory card, hard disk, flash drive, or external hard disk drive etc; the data inside the storage device will be erased and get lost. However, it is still possible to restore the lost data with format recovery software. As a matter of fact, the deleted files after formatting are still intact inside the storage device. With the help of format recovery software, it is possible to recover lost photos, videos, music, documents, images etc after formatting. In this article, I would like to recommend two kinds of powerful format recovery software to you.
Download the Following Software to Recover Data
#1 Data Recovery
Softwareto restore data off usb drive, memory card, pen drive, hard disk, external drive etc.
How to use:best disk recovery software for step by step guide
Free Download Data Recovery Software to Recover Files after formatting
This format recovery software (iCare Data Recovery ) to recover data after formatting
It is free and it only has a small size, so you can easily download and install it to your computer. It only takes up a little resource of your computer.
Download iCare recovery
Step1.Connect the storage device like to the computer. Once you have installed the format recovery software on your computer successfully, launch the software and choose the "Format Recovery" module for data recovery after formatting.
Step2. Choose the partition where you need to recover lost files and click "Recover" button, after which the program will begin to scan the selected partition in order to find the lost data.
Step3. After the scanning, you can see a partition list that contains all the partitions the software has found. Choose all the partitions and click the "Show Files" option to view all the files. Select all the files and click "Files Preview" button to preview those found files.
Step4.Mark all the files you want to recover and click "Save Files" button. Then choose a partition and create a new folder to save the selected files. Stop saving the selected files to the original partition in order to avoid original data being overwritten.
The following format recovery software(Stellar Data Recovery for Windows) for format recovery
Download Stellar for Format Recovery
The second format recovery software is also free and the steps are very easy as below:
Step1. Download and install the software to your computer. Launch the software and choose a recovery module for your case.
Step2. Choose the drive where you want to recover data and click "Start Scan" button. Then the software will scan the drive you selected and search for the lost files.
Step3. The whole scan process will be short; you only need to wait patiently while the scanning.
Step4. After scan, you can preview all the found files and save them to any other partition instead of the original one.
The Possibilities That You May Perform a Formatting
Although it is possible to recover lost data after formatting, the chance of formatting recovery depends on how you format the partition. For example, if you format the partition by accident and you haven’t written any new data to the formatted partition before data recovery; the chance of data recovery is extremely good. However, if the partition has not formatted error and forces you to perform a formatting; you should be careful with this situation. You have two choices for this situation, either format it or not format it. And the result will also be completely different. If you format the partition, the not formatted error may disappear but the data inside will be erased and the chance of data recovery is not good. If you don’t format the partition, you will have no way to access the data inside but the data can be recovered with format recovery software.
What You Should Pay Attention to When You Lose Data after Formatting?
1. No more new data to the formatted partition
Any new added data to the formatted partition will overwrite the lost files and make the data recovery difficult or even impossible.
2. No physical damage to the formatted partition
Once the partition has suffered physical damage, the data recovery is impossible.